Android Performance: Nested Hierarchies
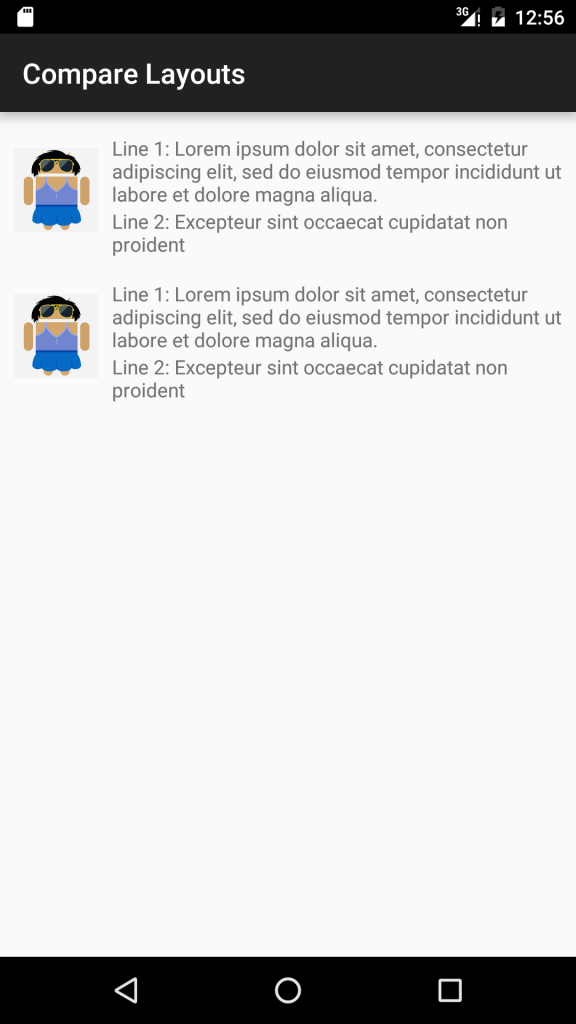
如果View进行了过多的嵌套,具有较深的层级关系,也会影响性能。下面例子使用Hierarchy Viewer比较了不同层级对性能的影响,Hierarchy Viewer能够可视化地显示布局中View的层级关系,用来对UI进行Debug和优化。代码可以在这里找到,运行后点击“COMPARE LAYOUTS”按钮,界面如图1所示。
其中包含了两个看似完全一样的布局,具体定义在activity_compare_layouts.xml:
<LinearLayout xmlns:android="http://schemas.android.com/apk/res/android"
    android:orientation="vertical"
    android:layout_width="match_parent"
    android:layout_height="wrap_content">

    <!-- Version 1. Uses nested LinearLayouts -->
    <LinearLayout xmlns:android="http://schemas.android.com/apk/res/android"
        android:orientation="horizontal"
        android:layout_width="match_parent"
        android:layout_height="wrap_content"
        android:layout_marginTop="@dimen/activity_vertical_margin">

        <ImageView
            android:id="@+id/chat_author_avatar1"
            android:layout_width="@dimen/avatar_dimen"
            android:layout_height="@dimen/avatar_dimen"
            android:layout_margin="@dimen/avatar_layout_margin"
            android:src="@drawable/joanna"/>

        <LinearLayout
            android:layout_width="match_parent"
            android:layout_height="wrap_content"
            android:orientation="vertical">

            <TextView
                android:layout_width="match_parent"
                android:layout_height="wrap_content"
                android:text="@string/line1_text" />

            <TextView
                android:layout_width="match_parent"
                android:layout_height="wrap_content"
                android:text="@string/line2_text"/>
        </LinearLayout>
    </LinearLayout>


    <!-- Version 2: uses a single RelativeLayout -->
    <RelativeLayout xmlns:android="http://schemas.android.com/apk/res/android"
        android:orientation="horizontal"
        android:layout_width="match_parent"
        android:layout_height="wrap_content"
        android:layout_marginTop="@dimen/activity_vertical_margin">

        <ImageView
            android:id="@+id/chat_author_avatar2"
            android:layout_width="@dimen/avatar_dimen"
            android:layout_height="@dimen/avatar_dimen"
            android:layout_margin="@dimen/avatar_layout_margin"
            android:src="@drawable/joanna"/>


        <TextView
            android:id="@+id/rl_line1"
            android:layout_width="match_parent"
            android:layout_height="wrap_content"
            android:layout_toRightOf="@id/chat_author_avatar2"
            android:text="@string/line1_text" />

        <TextView
            android:id="@+id/rl_line2"
            android:layout_width="match_parent"
            android:layout_height="wrap_content"
            android:layout_below="@id/rl_line1"
            android:layout_toRightOf="@id/chat_author_avatar2"
            android:text="@string/line2_text" />
    </RelativeLayout>
</LinearLayout>
从中可以看到,根部的LinearLayout中包含了两栏内容,分别使用LinearLayout嵌套和单个RelativeLayout实现了相同的视觉效果。
点击Android Studio工具栏的“Android Monitor”按钮,打开Android Monitor后,点击右上角“Open Perspective”按钮,打开Hierarchy Viewer,如图2所示。
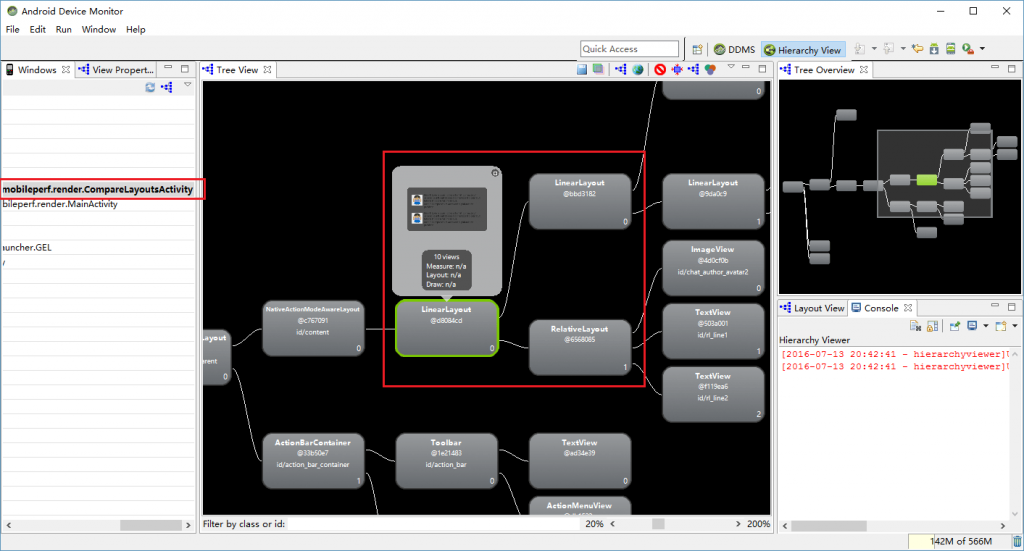
在左侧“Windows”下选择“CompareLayoutActivity”,在右边就会显示出该Activity的层级关系,找到并点击对应activity_compare_layouts.xml根部LinearLayout的方块,可见它后面连接了两个方块,分别是LinearLayout中的两栏内容,一个使用嵌套LinearLayout,一个使用RelativeLayout,如图3。
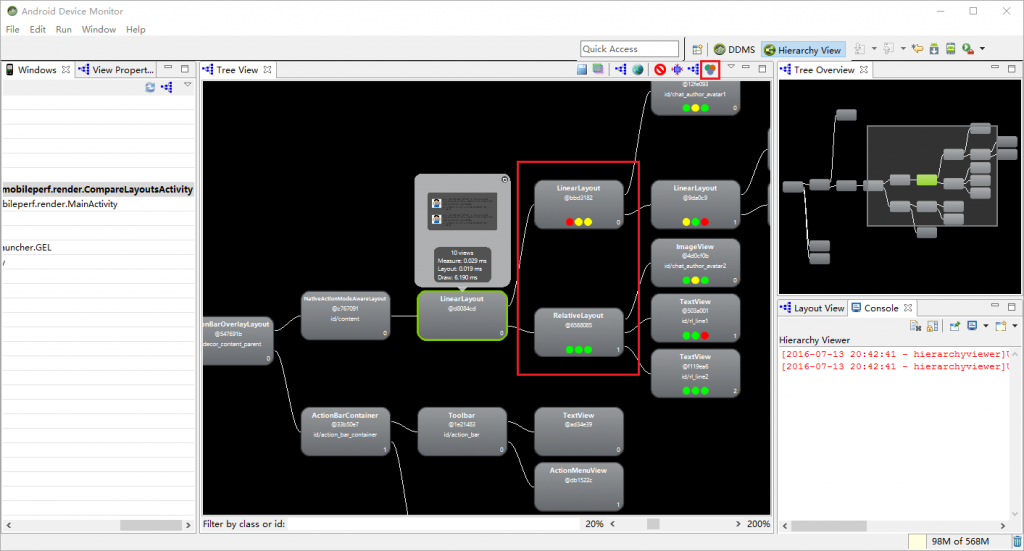
选中activity_compare_layouts.xml根部LinearLayout对应的方块后,点击Hierarchy Viewer右上角三色圆圈的按钮(Obtain layout times for tree rooted at selected node),结果如图4。
可以看到嵌套在根LinearLayout下的LinearLayout和RelativeLayout方块下面出现了三个彩色的圆圈。三个圆圈分别代表Measure、Layout和Draw三个阶段,颜色代表对应阶段的性能:
- 绿色代表该View在该阶段的耗时短于所选树中50%的View;
- 黄色代表该View在该阶段的耗时长于所选树中50%的View;
- 红色代表该View在该阶段的耗时在所选树中是最长的。
可见使用单个RelativeLayout的实现的性能要高于使用嵌套LinearLayout。尽可能减少View的嵌套,降低层级关系,可以提高性能。以chat_item.xml为例,它也使用了多个LinearLayout进行嵌套:
<LinearLayout xmlns:android="http://schemas.android.com/apk/res/android"
    android:layout_width="match_parent"
    android:layout_height="match_parent"
    android:orientation="horizontal"
    android:paddingBottom="@dimen/chat_padding_bottom">

    <ImageView
        android:id="@+id/chat_author_avatar"
        android:layout_width="@dimen/avatar_dimen"
        android:layout_height="@dimen/avatar_dimen"
        android:layout_margin="@dimen/avatar_layout_margin" />

    <LinearLayout
        android:layout_width="match_parent"
        android:layout_height="wrap_content"
        android:orientation="vertical">

        <RelativeLayout
            android:layout_width="wrap_content"
            android:layout_height="wrap_content"
            android:textColor="#78A"
            android:orientation="horizontal">

            <TextView xmlns:android="http://schemas.android.com/apk/res/android"
                android:layout_width="wrap_content"
                android:layout_height="wrap_content"
                android:layout_alignParentLeft="true"
                android:padding="@dimen/narrow_space"
                android:gravity="bottom"
                android:id="@+id/chat_author_name" />

            <TextView xmlns:android="http://schemas.android.com/apk/res/android"
                android:layout_width="wrap_content"
                android:layout_height="wrap_content"
                android:layout_alignParentRight="true"
                android:textStyle="italic"
                android:padding="@dimen/narrow_space"
                android:id="@+id/chat_datetime" />
        </RelativeLayout>

        <TextView xmlns:android="http://schemas.android.com/apk/res/android"
            android:layout_width="match_parent"
            android:layout_height="match_parent"
            android:padding="@dimen/narrow_space"
            android:id="@+id/chat_text" />
    </LinearLayout>

</LinearLayout>
而使用RelativeLayout,只保留一个层级就可以实现相同的效果,如这里所示:
<RelativeLayout xmlns:android="http://schemas.android.com/apk/res/android"
    android:layout_width="match_parent"
    android:layout_height="match_parent">

    <ImageView
        android:id="@+id/chat_author_avatar"
        android:layout_width="@dimen/avatar_dimen"
        android:layout_height="@dimen/avatar_dimen" />

    <TextView xmlns:android="http://schemas.android.com/apk/res/android"
        android:id="@+id/chat_author_name"
        android:layout_width="wrap_content"
        android:layout_height="wrap_content"
        android:layout_toRightOf="@id/chat_author_avatar"
        android:paddingLeft="@dimen/narrow_space" />

    <TextView xmlns:android="http://schemas.android.com/apk/res/android"
        android:id="@+id/chat_datetime"
        android:layout_alignParentRight="true"
        android:layout_width="wrap_content"
        android:layout_height="wrap_content"
        android:paddingRight="@dimen/narrow_space"
        android:textStyle="italic" />

    <TextView xmlns:android="http://schemas.android.com/apk/res/android"
        android:id="@+id/chat_text"
        android:layout_toRightOf="@id/chat_author_avatar"
        android:layout_below="@+id/chat_datetime"
        android:layout_width="match_parent"
        android:layout_height="match_parent"
        android:paddingLeft="@dimen/narrow_space"
        android:paddingBottom="@dimen/chat_padding_bottom" />
</RelativeLayout>


