Android App Widget实现举例
App Widget是可以嵌入在其他应用(通常是主屏幕)的小型应用,接受定时的更新。创建一个App Widget,至少需要:
- AppWidgetProviderInfo:使用xml描述Widget,如Widget的尺寸、布局、更新频率等。
- AppWidgetProvider:定义了与Widget进行交互的基本方法。
- View Layout:Widget对应的布局。
下面通过一个例子说明如何创建一个简单的App Widget。这个例子在RecyclerView使用方法举例(2)的基础上,为App添加一个Widget,用于在主屏幕显示电影海报,效果如图1所示。
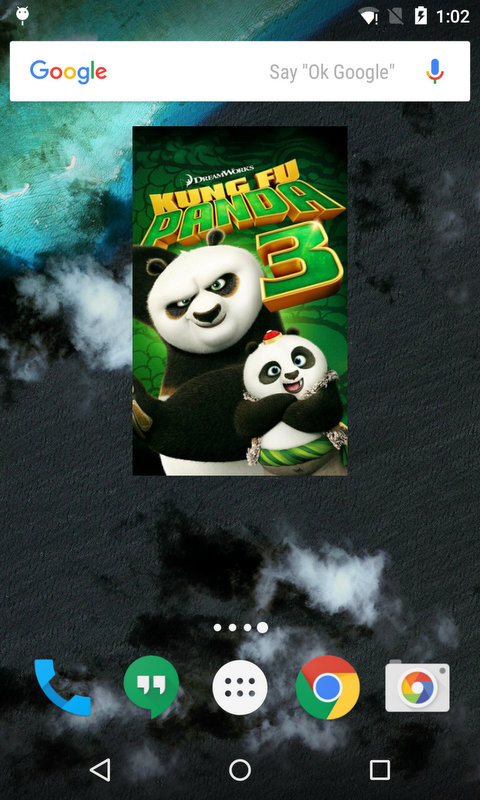
图1
Contents
1. 创建App Widget布局
1.1. App Widget的布局的限制
App Widget的布局基于RemoteViews,并不支持全部的Layout和View Widget。仅能使用以下四种Layout:
- FrameLayout
- LinearLayout
- RelativeLayout
- GridLayout
以及以下几种Widget:
- AnalogClock
- Button
- Chronometer
- ImageButton
- ImageView
- ProgressBar
- TextView
- ViewFlipper
- ListView
- GridView
- StackView
- AdapterViewFlipper
App Widget的布局不支持以上的派生以及自定义View。
1.2. Margin的控制
从Android 4.0开始,App Widget的边缘会被自动加入padding,用于更好地和图标对齐。为了在不同版本系统上获得相同的显示效果,在res/values/dimens.xml中定义:
<dimen name="widget_margin">8dp</dimen>
在res/values-v14/dimens.xml中定义:
<dimen name="widget_margin">0dp</dimen>
然后把widget_margin 添加到App Widget的布局里面,例如:
<FrameLayout xmlns:android="http://schemas.android.com/apk/res/android"
    xmlns:tools="http://schemas.android.com/tools"
    android:orientation="vertical"
    android:layout_width="match_parent"
    android:layout_height="match_parent"
    android:padding="@dimen/widget_margin" >

    <LinearLayout
        android:orientation="vertical"
        android:layout_width="match_parent"
        android:layout_height="match_parent" >
        ...
    </LinearLayout>
</FrameLayout>
1.3. 创建布局
创建App Widget布局widget_poster.xml如下,ImageView用于显示海报。
<?xml version="1.0" encoding="utf-8"?>
<FrameLayout xmlns:android="http://schemas.android.com/apk/res/android"
    xmlns:tools="http://schemas.android.com/tools"
    android:orientation="vertical"
    android:layout_width="match_parent"
    android:layout_height="match_parent"
    android:padding="@dimen/widget_margin" >

        <ImageView
            android:id="@+id/widget_movie_poster"
            android:layout_width="match_parent"
            android:layout_height="match_parent"
            android:scaleType="centerCrop"
            android:adjustViewBounds="true"
            android:src="@drawable/placeholder_poster"
            tools:src="@drawable/placeholder_poster" />

</FrameLayout>
【完整代码】
2. 创建AppWidgetProviderInfo
首先需要创建用于描述Widget的AppWidgetProviderInfo。在res目录下创建xml文件夹,在其中新建simple_widget_info.xml如下:
<?xml version="1.0" encoding="utf-8"?>
<appwidget-provider xmlns:android="http://schemas.android.com/apk/res/android"
    android:minWidth="110dp"
    android:minHeight="180dp"
    android:previewImage="@drawable/poster_widget_preview"
    android:updatePeriodMillis="1800000"
    android:initialLayout="@layout/poster_widget"
    android:resizeMode="horizontal|vertical"
    android:widgetCategory="home_screen">
</appwidget-provider>这里android:previewImage 是在选择Widget时显示的预览图片,如果不提供,默认使用应用图标。Android模拟器自带了一个获取Widget预览图片的应用。android:updatePeriodMillis 是更新间隔,最短为30分钟。android:initialLayout 指定了Widget的布局。android:widgetCategory 用于声明Widget是用于主屏幕(home_screen )还是锁屏(keyguard ),只有5.0之前版本支持锁屏Widget,5.0及之后版本仅home_screen 有效。
3. 创建AppWidgetProvider
创建SimpleWidgetProvider继承AppWidgetProvider,为其添加onUpdate() 方法。该方法会在更新App Widget时被调用。注意这里仍处于Main Thread,不适合进行耗时的操作。可以将耗时操作放在IntertService中处理。
public class SimpleWidgetProvider extends AppWidgetProvider {
    @Override
    public void onUpdate(Context context, AppWidgetManager appWidgetManager, int[] appWidgetIds) {
        context.startService(new Intent(context, SimpleWidgetIntentService.class));
    }
}
【完整代码】
接下来创建用于进行耗时操作的IntentService如下:
public class SimpleWidgetIntentService extends IntentService {
    public SimpleWidgetIntentService() {
        super("SimpleWidgetIntentService");
    }

    @Override
    protected void onHandleIntent(Intent intent) {
        AppWidgetManager appWidgetManager = AppWidgetManager.getInstance(this);
        int[] appWidgetIds = appWidgetManager.getAppWidgetIds(new ComponentName(this,
                SimpleWidgetProvider.class));

        MovieService movieService = App.getRestClient().getMovieService();
        Call<MovieResponse> call = movieService.getMovies(MovieService.SORT_BY_POPULARITY_DESC, 1);

        try {
            MovieResponse response = call.execute().body();
            List<Movie> movies = response.getMovies();

            Random random = new Random();
            int pick = random.nextInt(movies.size());

            String posterPath = movies.get(pick).getPosterPath();
            Bitmap poster = ImageUtility.downloadBitmap(ImageUtility.getImageUrl(posterPath));

            for (int appWidgetId : appWidgetIds) {
                Intent launchIntent = new Intent(this, MainActivity.class);
                PendingIntent pendingIntent = PendingIntent.getActivity(this, 0, launchIntent, 0);

                RemoteViews views = new RemoteViews(getPackageName(), R.layout.widget_poster);
                views.setOnClickPendingIntent(R.id.widget_movie_poster, pendingIntent);
                views.setImageViewBitmap(R.id.widget_movie_poster, poster);

                appWidgetManager.updateAppWidget(appWidgetId, views);
            }
        } catch (IOException e) {
            Log.e(LOG_TAG, e.getMessage());
        }
    }
}
【完整代码】
用户可以向主屏幕添加多个相同的App Widget,这些App Widget通过各自的ID来区别。首先由AppWidgetManager获取了appWidgetIds ,appWidgetIds 保存了目前所有的App Widget的ID。然后在循环for (int appWidgetId : appWidgetIds) 里面,对各个App Widget进行更新:首先获取RemoteViews,为其添加OnClickPendingIntent(点击App Widget会打开MainActivity),并通过setImageViewBitmap() 为其添加之前下载的海报图片。
4. 在Manifest中声明App Widget
将之前实现的AppWidgetProvider,也就是SimpleWidgetProvider,加入到AndroidManifest.xml中:
<receiver android:name=".widget.SimpleWidgetProvider"
    android:label="@string/simple_widget_name" >
    <intent-filter>
        <action android:name="android.appwidget.action.APPWIDGET_UPDATE" />
    </intent-filter>
    <meta-data android:name="android.appwidget.provider"
        android:resource="@xml/simple_widget_info" />
</receiver>这里的android:label 会显示在选择App Widget的界面。
至此便完成了一个App Widget的创建。
5. 完整代码。
完整代码可以参考这里。
6. 关于AppWidgetProvider
AppWidgetProvider继承自BroadcastReceiver,在源码中可以看到,AppWidgetProvider在onReceive() 中对接收到的Intent进行解析,并调用对应的方法进行处理。
    /**
     * Implements {@link BroadcastReceiver#onReceive} to dispatch calls to the various
     * other methods on AppWidgetProvider.
     *
     * @param context The Context in which the receiver is running.
     * @param intent The Intent being received.
     */
    // BEGIN_INCLUDE(onReceive)
    public void onReceive(Context context, Intent intent) {
        // Protect against rogue update broadcasts (not really a security issue,
        // just filter bad broacasts out so subclasses are less likely to crash).
        String action = intent.getAction();
        if (AppWidgetManager.ACTION_APPWIDGET_UPDATE.equals(action)) {
            Bundle extras = intent.getExtras();
            if (extras != null) {
                int[] appWidgetIds = extras.getIntArray(AppWidgetManager.EXTRA_APPWIDGET_IDS);
                if (appWidgetIds != null && appWidgetIds.length > 0) {
                    this.onUpdate(context, AppWidgetManager.getInstance(context), appWidgetIds);
                }
            }
        } else if (AppWidgetManager.ACTION_APPWIDGET_DELETED.equals(action)) {
            Bundle extras = intent.getExtras();
            if (extras != null && extras.containsKey(AppWidgetManager.EXTRA_APPWIDGET_ID)) {
                final int appWidgetId = extras.getInt(AppWidgetManager.EXTRA_APPWIDGET_ID);
                this.onDeleted(context, new int[] { appWidgetId });
            }
        } else if (AppWidgetManager.ACTION_APPWIDGET_OPTIONS_CHANGED.equals(action)) {
            Bundle extras = intent.getExtras();
            if (extras != null && extras.containsKey(AppWidgetManager.EXTRA_APPWIDGET_ID)
                    && extras.containsKey(AppWidgetManager.EXTRA_APPWIDGET_OPTIONS)) {
                int appWidgetId = extras.getInt(AppWidgetManager.EXTRA_APPWIDGET_ID);
                Bundle widgetExtras = extras.getBundle(AppWidgetManager.EXTRA_APPWIDGET_OPTIONS);
                this.onAppWidgetOptionsChanged(context, AppWidgetManager.getInstance(context),
                        appWidgetId, widgetExtras);
            }
        } else if (AppWidgetManager.ACTION_APPWIDGET_ENABLED.equals(action)) {
            this.onEnabled(context);
        } else if (AppWidgetManager.ACTION_APPWIDGET_DISABLED.equals(action)) {
            this.onDisabled(context);
        } else if (AppWidgetManager.ACTION_APPWIDGET_RESTORED.equals(action)) {
            Bundle extras = intent.getExtras();
            if (extras != null) {
                int[] oldIds = extras.getIntArray(AppWidgetManager.EXTRA_APPWIDGET_OLD_IDS);
                int[] newIds = extras.getIntArray(AppWidgetManager.EXTRA_APPWIDGET_IDS);
                if (oldIds != null && oldIds.length > 0) {
                    this.onRestored(context, oldIds, newIds);
                    this.onUpdate(context, AppWidgetManager.getInstance(context), newIds);
                }
            }
        }
}例如对于ACTION_APPWIDGET_UPDATE ,首先尝试App Widget ID列表appWidgetIds ,然后调用onUpdate() ,我们在自己实现的SimpleWidgetProvider中重写了onUpdate() ,用于进行具体的更新操作。
在SimpleWidgetProvider中,通过重写onReceive() ,可以让SimpleWidgetProvider接收自定义广播,如:
@Override
public void onReceive(@NonNull Context context, @NonNull Intent intent) {
    super.onReceive(context, intent);
    if (SunshineSyncAdapter.ACTION_DATA_UPDATED.equals(intent.getAction())) {
        context.startService(new Intent(context, TodayWidgetIntentService.class));
    }
}